
"Shout out to Zeb for the Reverie stamp layout. He knocked it out of the park."
Watch The Full DIY Tutorial
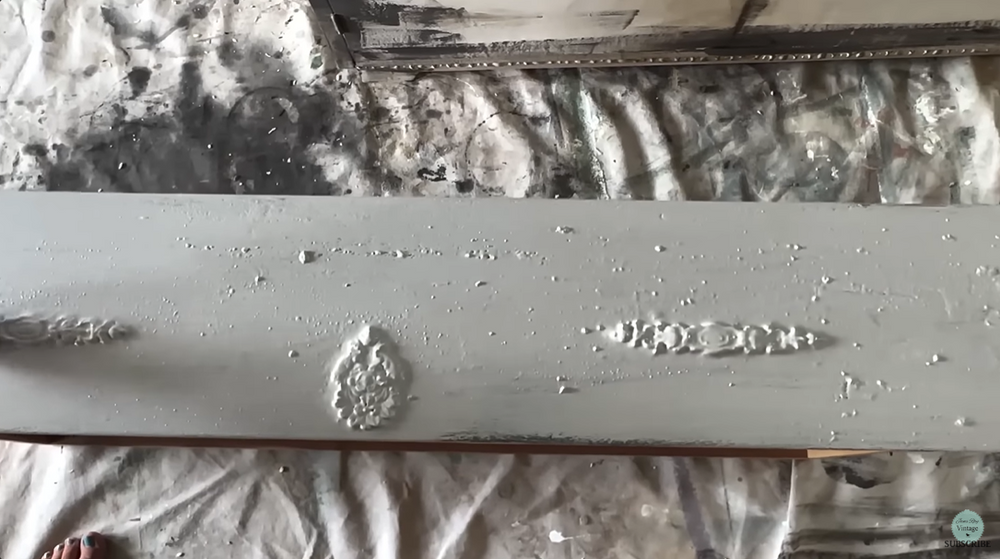

"I love how Iron Orchid Designs moulds & stamps plus the texture of the paint & Saltwash completely elevated this simple midcentury modern dresser."
Team old and grungy or team - give me one simple color? It’s been months since I took an entire day and layered on paint. We started with a plain Jane roadside found dresser and an old, mismatched mirror.
We added layers of paint, Iron Orchid Design's Moulds and Stamp. And this is what we ended up with.
To watch the full transformation, use the button below to watch on our channel. You can also shop the paint and products we used in this paint layer makeover below.

Paint & Products
Transforming Trash to Treasure: Mastering the Old World Style French Provincial Furniture Painting with Jami Ray Vintage
In the vast world of DIY and home improvement, there's a particular niche that has gained immense popularity over the years - transforming old, discarded furniture into stunning pieces of art. One such creative endeavor that has captured the attention of many enthusiasts is the YouTube video titled "Trash to Treasure - How to Paint Furniture in Old World Style - French Provincial" by Jami Ray Vintage.
Jami and Zeb Ray, are seasoned DIYer and furniture restoration expert. Their channel has become a go-to destination for individuals seeking inspiration and guidance on reviving worn-out furniture. In this particular video, Jami and Zeb take their viewers on a journey of turning an ordinary piece of furniture into a French Provincial masterpiece, all while incorporating the Old World style.
The video begins with Jami introducing the project - a neglected piece of furniture that has seen better days. With a keen eye for potential and a passion for reviving the past, she dives into the intricate process of transforming trash into a true treasure.
One of the highlights of Jami and Zebs approach is their commitment to sustainability and eco-friendly practices. They emphasize the importance of repurposing and upcycling, encouraging viewers to think twice before discarding old furniture. This aligns with the growing trend of conscious consumerism and the desire to reduce environmental impact.
As the video progresses, they delve into the specific techniques involved in achieving the Old World style, particularly the French Provincial aesthetic. Viewers are treated to a step-by-step guide on the materials required, surface preparation, and the application of paint and finishes. Jami's expert commentary provides valuable insights into the nuances of achieving an authentic and timeless look.
The choice of colors plays a pivotal role in capturing the essence of French Provincial design. Jami and Zeb carefully select a palette that reflects the subdued elegance associated with this style. Soft creams, muted blues, and delicate grays come together harmoniously, creating a color scheme that evokes a sense of vintage charm.
Throughout the video, Jami and Zeb skillfully demonstrates various painting techniques, such as distressing and antiquing, to add depth and character to the furniture piece. Their explanations are clear and concise, making the seemingly complex process accessible even to beginners. This inclusive approach is a testament to their dedication to fostering a community of DIY enthusiasts.
Beyond the technical aspects, what sets Jami and Zebs tutorial apart is their infectious passion for the craft. Their genuine excitement about each brushstroke and the transformative power of paint resonates with viewers, inspiring them to embark on their own creative journeys. It's not just a tutorial; it's a celebration of the art of furniture restoration.
As the video nears completion, viewers witness the final reveal – a breathtaking French Provincial masterpiece that defies its humble origins. The sense of accomplishment and pride radiating from Jami is palpable, reinforcing the notion that anyone can unleash their creativity with the right guidance.
In addition to the hands on tutorial, Jami and Zeb take moments to share anecdotes and personal insights, creating a connection with her audience. This personal touch adds a layer of authenticity to the content, making it more than just a DIY tutorial – it's a shared experience between them and their viewers.
The video concludes with Jami and Zeb encouraging viewers to embrace the imperfections and uniqueness of their creations. It's a powerful message that extends beyond furniture restoration – a reminder that beauty can be found in the unconventional and that creativity knows no bounds.
In essence, "Trash to Treasure - How to Paint Furniture in Old World Style - French Provincial" by Jami Ray Vintage is more than just a tutorial; it's a celebration of creativity, sustainability, and the timeless art of transforming the old into something new. As viewers embark on their own DIY adventures, they'll undoubtedly carry with them the inspiration and guidance imparted by Jami and Zeb, turning their trash into treasures that tell a story of craftsmanship and passion.
paint paint paint
Salt Wash is a textured additive that can be mixed with paint to create a weathered, layered finish on furniture, walls, or other surfaces. Here are the steps for using Salt Wash:
Gather Materials: Ensure you have all the necessary materials, including Salt Wash additive, your chosen paint colors, a mixing container, a stir stick, a paintbrush or roller, and the surface you want to paint.
Prepare the Surface: Clean and prepare the surface you plan to paint. Sand it if needed and make sure it's free of dust and debris. If you're working with furniture, remove any hardware or accessories that may get in the way.
-
Mixing Salt Wash:
- In a mixing container, combine the Salt Wash additive with your chosen paint color. The recommended ratio is typically 1 part Salt Wash to 1 part paint, but you can adjust it based on your desired texture.
- Stir the mixture thoroughly until the Salt Wash is evenly distributed in the paint.
-
Texture Application:
- Apply the mixed Salt Wash paint using a brush or roller. The goal is to create a textured, layered effect. Experiment with different strokes and techniques to achieve the desired texture.
- Work in sections, as Salt Wash dries relatively quickly.
-
Layering Colors (Optional):
- If you want a more intricate finish, consider layering different colors. Allow each layer to dry before applying the next one.
- You can use a different Salt Wash mixture for each layer or mix the Salt Wash with the same color for a subtle variation.
-
Distressing (Optional):
- Once the Salt Wash paint has dried, you may choose to distress the surface to enhance the weathered look. Sandpaper or a sanding block can be used to gently distress edges and corners.
-
Sealing (Optional):
- Depending on the project and your preference, you may want to seal the finished surface with a clear topcoat or wax. This step helps protect the Salt Wash finish and enhances its durability.
-
Clean-Up:
- Clean your brushes, rollers, and mixing container promptly after use. Salt Wash can have a gritty texture, so it's essential to clean your tools thoroughly.
-
Allow for Drying:
- Allow the Salt Wash finish to dry completely. Drying times may vary based on environmental conditions and the specific paint used, so refer to the paint manufacturer's recommendations.
-
Admire Your Textured Finish:
- Once everything is dry, step back and admire the textured finish you've created. The layered, weathered look achieved with Salt Wash can add depth and character to furniture, walls, or any other surface.
Remember that experimentation is key when using Salt Wash. Feel free to play with different colors, layering techniques, and distressing methods to achieve a custom look that suits your style and preferences.